An Article by Guest Author Renee Cafaro
In these uncertain times, you may be yearning for something fun and fresh to brighten your day but quarantine, social distancing and financial insecurity have made it all feel just out of reach. As a self-proclaimed shopaholic, I’m struggling without at least a bit of window shopping to look forward to. I’ve decided to turn to honing my DIY skills in order to give my wardrobe a boost on a budget. After weeks of trial and error, I’ve collected for you the best trends you can create at-home.
 Tie-Dye
What you need: A kit or rubber bands, dye, latex gloves, and a microwave safe container with a lid
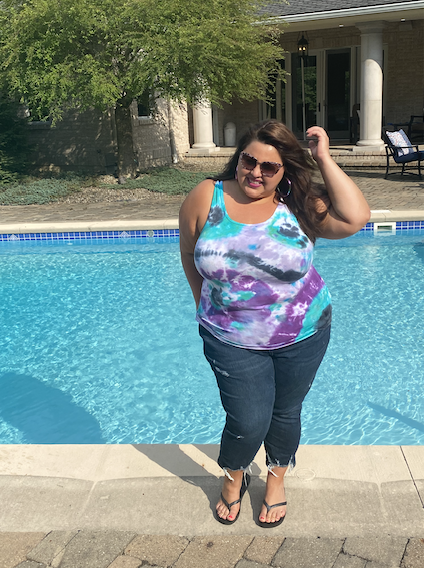
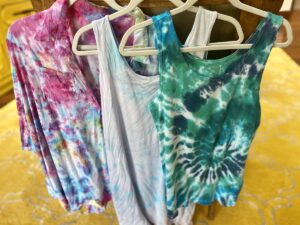
Even before we became homebound crafters, tie-dye was showing up all over e-commerce sites and swiftly emerged as the biggest summer trend. At first, I was daunted. I assumed that my tying skills may make my designs look more gross than groovy, but I was pleasantly surprised by the ease of classic techniques like the swirl, bullseye and scrunch. Out of all of the tie-dye kits, by far the easiest was Tulip’s 2-minute tie dye. You follow the simple instructions on how to bind up your garment of choice, saturate each segment with dye and set it in only a couple minutes in the microwave. The kit has all the supplies you need but you can use this method with any dye and a microwave safe plastic container with a lid. Once you remove it from the microwave, you leave it in the closed container for 15 minutes, air it out for 5, and when it is cool to the touch, rinse it out and reveal your professional-looking piece. So simple! White cotton garments work the best but you can dye anything any color. I even took an old chambray shirt and treated it with bleach and dark blues and purples to give it a new life.
The bright colors and patterns brought me so much glee, but you can use ombré or stripe techniques with darker colors (or even dye it solid!) to transform old clothing into a trendy new piece even in the fall!
 Reverse Tie-Dye
What you need: Any black or navy clothing, rubber bands, bleach, water and squeeze bottle (or anything that’s easy to pour from).
As a New Yorker who arguably owns too much black clothing, I have plenty to spare to make something new with a reverse dying technique. You tie your dark garment in the desired pattern you’d like with the rubber bands and carefully cover the segments you’d like lighter with a 1-1 ratio mixture of bleach and water. I find that the best pattern to use with bleach is a simple stripe fold: fold vertically like an accordion and then bind with a rubber band every few inches. Once you pour on the bleach mix, you will see the fabric change color instantly. When it reaches the desired shade, you can rinse it out. That’s it! Black turns into a fiery range of orange and crimson, leaving a very unique look that’s more haute than hippie.
The Cut up:
What you need: Scissors and a ruler.
Clearly we all know that we can take an old pair of jeans and make a great pair of Daisy Dukes for the summer, but what about taking a bit off our tops? Have concert shirts that are unflattering unisex tees? Make them sexy and fun with only a few snips. From the center of the crew neck, fold the front of the neckline in half vertically and cut a small triangle just below the neck band. Remember folding paper in half to cut out a heart shape as a kid? Same concept. This will give a boring tee a cute keyhole neckline. This fall, give ‘em the cold shoulder by laying any long-sleeve shirt flat, measuring out an L-shape over the shoulders and cutting along the L. Jersey and denim work best for a DIY cold-shoulder top as they do not fray too much.
If you want to take this next-level, you can buy some seam rippers to cleanly remove sleeves to create vests out of any old jackets or blouses.
 Mini-to-Maxi
What you need: any tube bodycon summer dress
This is a very simple idea that isn’t really DIY, but most people don’t think of reworking how you style summer clothing. Maybe you have an old club dress or strapless stretchy sundress in your closet. Pull it down to wear as a skirt with a tank top or tied blouse for the summer or a sweater and boots in the fall!
Resin Setting
What you need: Resin/hardener, resin dye or acrylic paint, silicone jewelry molds, cups, and stir sticks.
This hobby requires a bit of investment but once you get everything you need set up, the possibilities are endless. I was able to get all the supplies on Amazon, Etsy or Michael’s for not very much money and now can make fun new accessories for any season. I was particularly excited to find a 9 inch bangle mold so I can finally have a sassy stack of bracelets on my plus-size arm! Most on the market barely get past my knuckles! Again, there are full kits you can start with but I found the fun is in getting creative with what you add into the resin! Once you mix an equal part of resin to hardener and mix into a cup, you can separate it into as many cups as you want to color with dyes, mica pigments, glitter or even 2-3 drops of acrylic paints. Once it is the color you want or bubble-free if you are doing clear, carefully pour into the mold. 12 hours later you will have perfect, hard, shiny bracelets. With silicone molds for only a few dollars on Etsy, you can make anything your heart desires for pennies! You will never want to waste money on funky accessories ever again!
I hope you have a blast letting your imagination run free for almost free! Follow me on Instagram for more fashion inspo and DIY to get us all through 2020 a little bit easier.
Renee Cafaro is an influencer, activist and writer known as FoxyRoxyFashion living in NYC.